

You’ve travelled the world — Asia, Africa, the Americas, Antarctica, Europe, and Australia. You’ve visited places most people only see in photos. What next? Learn how to start a travel blog and turn those experiences into a platform that helps, inspires, and earns.
Travel blogging is one of the few content businesses where your firsthand experience is the product. No other blogger can replicate your specific routes, your perspective on local culture, or the stories you alone collected along the way.
The global travel industry generates over $11 trillion annually, and a significant share of every traveller’s planning journey begins with a Google search or a blog recommendation. That’s the opportunity.
Travel bloggers who build the right foundation — the right niche, a self-hosted WordPress blog, a consistent content strategy, and diversified monetization — can turn a passion for travel into sustainable income.
In this guide, you will learn all the steps required to start and make money from travel blogging, even if you’ve never written a blog post before.
Here are the 8 steps to starting a travel blog:
- Market Research
- Register a Domain Name
- Choose a Web Host
- Pick a Travel WordPress Theme
- Install Travel Blog Plugins
- Publish Your First Content
- Build Your Audience
- Make Money With Travel Blogging
Now let’s explore these steps and start building your travel blog from scratch.
How to Start a Travel Blog – Setup Guide
Step 1: Market Research
The most important step in determining your travel blog’s success or failure is understanding your target market before you publish a single post.
The travel niche is broad. Within it, you’ll find dozens of viable sub-niches: budget travel, luxury travel, adventure travel, solo female travel, family travel, backpacking, van life, digital nomad lifestyle, sustainable travel, food tourism, cultural travel, and destination-specific guides.
Each attracts a different audience, different search volume, and different monetization potential.
Your personal travel experience plays a significant role in your selection — but experience alone isn’t enough.
A topic you’re passionate about still needs search demand and commercial value to build a viable blog around.
Market research answers three questions before you commit:
Rank Tracker is one of the most reliable tools for this research. Sign up for a free account, enter your seed keyword — “budget travel Southeast Asia,” “solo female travel tips,” “family travel Europe” — and analyze search volume, keyword difficulty, and the CPC (cost per click) for related terms.
A high CPC signals that advertisers are actively spending money to reach that audience, which directly correlates with the potential for affiliate and display ad revenue.
Long-tail keyword research also reveals the specific destination guides, itinerary posts, and travel tips your audience is actively searching for — which becomes the foundation of your content calendar before you write your first post.
Step 2: Register a Domain Name
With your niche confirmed, register a domain name that reflects your blog’s identity.
Your domain name can reflect your travel topic, your name, or a creative combination of both. Personal brands — a blogger’s name paired with “travels” or “adventures” — work well for lifestyle-driven travel blogs.
Topic-driven domains work better for niche-specific sites, such as budget destination guides or adventure travel resources.
General guidelines that hold up:
Namecheap’s domain search tool is a reliable starting point. If you’re stuck on naming, a domain name generator — enter your niche and a few descriptive words — can surface combinations you wouldn’t generate manually.
Step 3: Choose a Web Host
A travel blog is media-heavy by nature. High-resolution photography, embedded videos, interactive maps, and destination gallery pages all demand a web host that delivers fast load times, reliable uptime, and sufficient storage capacity.
Slow-loading travel blogs lose readers quickly. Page speed is a Google ranking factor — and in a niche where visual content is the primary audience hook, a blog that takes 4 seconds to load is already losing to the competition.
Namecheap and Hostinger are two reliable options for beginners. Namecheap is the more affordable option with comparable core features.
Both provide:
As your blog grows and traffic increases, you’ll want to evaluate managed WordPress hosting. Cloudways and Kinsta offer significantly better performance for high-traffic travel sites.
Start with shared hosting, but don’t stay on it longer than necessary once your audience grows.
Step 4: Pick a Travel WordPress Theme
Your blog theme controls how your travel photography, destination guides, and travel stories are presented visually.
For a travel blog, where stunning imagery is a core part of the reader experience, design matters more than it does on a text-heavy blog.
A poorly chosen theme buries your best photography in small thumbnails, creates clunky navigation between destination guides, and loads slowly on mobile, where most travel content is consumed.
Astra Pro is one of the strongest choices for travel bloggers. At $69/year for the Pro plan, it gives you:
The Astra starter templates let you import a complete travel blog design, including homepage, destination pages, about page, and contact page — in minutes, without touching any code.
Templates support full integration with Elementor and Beaver Builder, giving you drag-and-drop control over every page.
For travel blogs specifically, look for templates that support large hero images, image carousels, grid-based destination galleries, and map embeds.
Visual storytelling is the competitive advantage of a well-designed travel blog. Your theme should amplify it, not constrain it.
Step 5: Install WordPress Travel Blog Plugins
Plugins extend what your WordPress blog can do without requiring any coding knowledge. A travel blog has specific functional needs — interactive maps, photo galleries, itinerary layouts — beyond what the standard plugin stack covers.
Core plugins every WordPress blog needs:
Travel-specific plugins worth installing:
The combination of a fast-loading cache plugin and a well-structured SEO plugin is particularly important in the travel niche, where destination guide posts compete against established travel media sites with significant domain authority.
Step 6: Publish Your First Content
Travel blog content falls into several distinct formats, each serving a different reader intent:
Your content strategy should include all of these formats. But destination guides and travel itineraries are your highest-value SEO content because they directly match the search queries travellers type into Google when planning a trip.
Travel photography is the visual backbone of your content. A wide-angle lens captures landscapes and architecture at their full scale.
A zoom lens is essential for wildlife destinations. A stabilized mirrorless camera handles varying light conditions across different environments.
Drone footage adds a perspective most travel blogs can’t offer. If you’re starting with a limited equipment budget, modern flagship smartphones — particularly in portrait and wide modes — produce publishable quality for most travel content.
Photo editing is part of the publishing workflow. Lightroom (desktop or mobile) gives you consistent color grading and tonal adjustments that make your destination photography look intentional and professional rather than casual.
When you’re ready to publish, log into your WordPress admin dashboard, navigate to Posts → Add New, write your content, upload your images with descriptive alt text that includes your destination keyword, and hit publish.
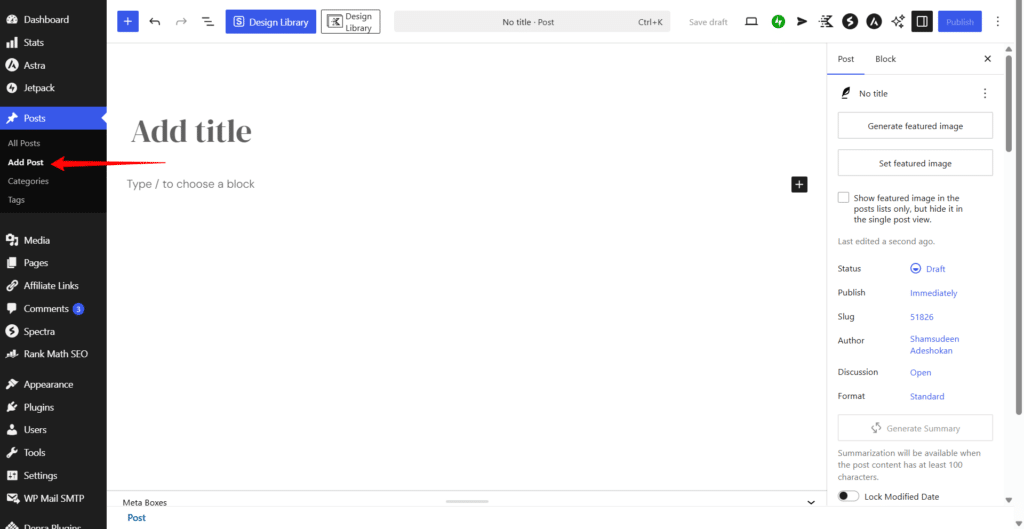
Your first travel blog post is live.
Step 7: Build Your Audience
Traffic for a travel blog comes from three primary sources — each requiring a different strategy and timeline.
Search engine traffic is your long-term foundation. Destination guides and itinerary posts optimized for specific travel keywords such as, “10 days in Japan itinerary,” “budget travel Colombia tips,” “best time to visit Patagonia”, generate passive organic traffic for years after publishing.
Keyword research from Step 1 feeds directly into your content calendar here.
Pinterest is the highest-performing social platform for travel content. Travel photography pins drive significant referral traffic because Pinterest functions as a visual search engine. Pinterest users actively search for destination inspiration, travel itineraries, and packing guides.
Create vertical pins (1000 x 1500px) for every destination post, with keyword-rich descriptions, and pin consistently to relevant boards.
Instagram builds brand awareness and audience connection. Location tags, travel hashtags, and Reels featuring destination footage reach new audiences and drive profile visits.
Instagram doesn’t send direct link traffic efficiently, but it builds the audience trust that converts readers into newsletter subscribers and loyal blog followers.
An email list is the most durable audience asset a travel blogger can build. Social platforms change algorithms; your subscriber list doesn’t.
Offer a useful lead magnet — a packing checklist, a destination guide PDF, a budget travel template — in exchange for email sign-ups. Your newsletter becomes a direct driver of traffic to every new post you publish.
Add social sharing buttons to every post so readers can distribute your content to their networks without friction.
Step 8: Make Money With Travel Blogging
Sustainable travel blog income comes from multiple streams. Relying on one source — particularly display advertising alone — creates fragile income that fluctuates with traffic volume.
Here are some ways to monetize a travel blog.
Display Advertising
Display ads through networks like Mediavine (35,000 monthly sessions minimum) or Raptive (100,000 monthly pageviews minimum) generate passive income from every visitor to your blog.
Travel is a high-CPM niche — advertisers pay premium rates to reach travel-intent audiences, particularly around peak booking seasons.
The downside is that meaningful income requires meaningful traffic. Display advertising rewards consistency and patience over the long term.
Affiliate Marketing
Affiliate marketing is the highest-revenue potential income stream for most travel bloggers. You earn a commission every time a reader books or buys through your affiliate link.
The strongest travel affiliate programs:
Destination guides and itinerary posts have the strongest affiliate conversion rates because readers in trip-planning mode are ready to book. They’re searching for exactly what your affiliate links provide.
Sponsored Posts and Brand Partnerships
As your blog builds traffic and topical authority, travel brands — gear companies, luggage brands, travel apps, booking platforms — will approach you for sponsored content.
Sponsored posts on mid-size travel blogs range from $50 to $1,000 per post; established blogs with large, engaged audiences charge significantly more.
Press Trips and Tourism Board Partnerships
Tourism boards, hotels, and travel companies sponsor blogger trips in exchange for coverage like destination guides, social media content, and photography.
Press trips are among the most valuable non-cash benefits of travel blogging and typically become available once your blog reaches a meaningful audience size and level of engagement.
Your media kit — a professional document showing your traffic, audience demographics, and social reach — is what gets you considered.
Sponsored Trips
Beyond press trips, individual brands and travel companies pay travel bloggers to visit specific destinations and document the experience on their blogs and social channels.
This is the intersection of travel journalism and content marketing.
Digital Products
Your travel expertise is sellable in multiple formats: ebooks, destination travel guides, trip planning templates, photography presets, and online courses.
Digital products generate income without inventory, shipping, or the audience size threshold that display advertising requires.
Donation
A donate button — through Buy Me a Coffee or a similar platform — gives loyal readers a way to support your work directly.
This channel performs best once you’ve built a genuine community around your blog.
There is no ceiling on how much a travel blog can earn. As your audience grows and your content library expands, new monetization opportunities open alongside existing income streams.
FAQ About Starting a Travel Blog
Conclusion
Travel blogging is exciting and fun, and allows you to live your experiences as the blog product. That’s a real competitive advantage, but only if you build the right foundation under it.
The steps in this guide give you that foundation: a defined niche, a self-hosted WordPress blog, a content strategy built around what travellers actually search for, and monetization channels that grow as your audience does.
The bloggers who struggle are almost always the ones who start publishing without a clear niche or skip the technical setup in favour of jumping straight to content. Those who build sustainable travel blogs take the setup phase as seriously as the writing phase.
Pick one step from this guide and execute it today — not this week, but today. Momentum in the early stages of a blog comes from consistent small actions, not occasional bursts of effort.
Your next trip is content. Your past trips are complete. You already have more material than most bloggers ever develop. The only thing left is to build the platform to share it.


Travel allows us to explore new places, meet new people, and create unforgettable memories. It broadens our perspectives and teaches us about different cultures, traditions, and ways of life. Whether it’s for leisure or business, traveling provides an opportunity to escape the routine and embrace new experiences.
Thanks for your comments.