
Astra is one of the most versatile WordPress themes available today, flexible enough to build almost any website design, including fully custom layouts. But Astra isn’t just a design tool.
Bundled inside Astra Pro is a feature called Site Builder, and part of it, the Hooks Layout, gives you a built-in way to add and manage third-party and custom code, such as tracking pixels, analytics tags, marketing, and verification scripts.
Instead of installing another WordPress plugin just to place a script in your website header or footer, you can handle it directly inside the Astra Site Builder.
In this guide, we’ll focus specifically on that use case: adding and managing scripts with Astra Site Builder. We won’t cover every Site Builder feature or use case (you can learn that on Astra’s own Site Builder overview page), just the part that matters for script management.
What Is Astra Site Builder’s Hook Feature?
Site Builder is a premium feature in Astra Pro that lets you build custom headers, footers, single post and page templates, archive pages, 404 pages, and more, all without writing code. One of its layout types, Hooks, is designed to insert content at specific points across your site.
That’s the part we’re using here.
Hooks work inside the WordPress blocks editor and the code editor, so they’re compatible with most popular page builders, including Elementor, Spectra, and Kadence Blocks.
Why Use Hooks Instead of a Basic Code Snippet Plugin?
Plenty of plugins let you paste a script into your header and footer. What sets Astra Site Builder apart is the level of control you get over where, when, and whom that script loads.
None of that requires touching your theme files or hiring a developer.
Before Your Start
You’ll need the Astra Pro plugin active with a valid licence, since Site Builder is part of Astra’s premium feature set. The free Astra theme doesn’t include it.
If you’re still deciding whether it’s worth upgrading, our full Astra Pro review covers what you get for the price, and if you haven’t settled on a theme yet, our Astra vs Kadence comparison is a good starting point.
We’ve also covered a full comparison of Astra free vs Pro, if that helps you make the right decision.
Step 1: Open Site Builder
If you’re activating Astra Pro for the first time, go to the Astra dashboard, scroll to the Astra Pro Modules section, and ensure the Site Builder toggle is on. Once enabled, the Site Builder features are accessible.
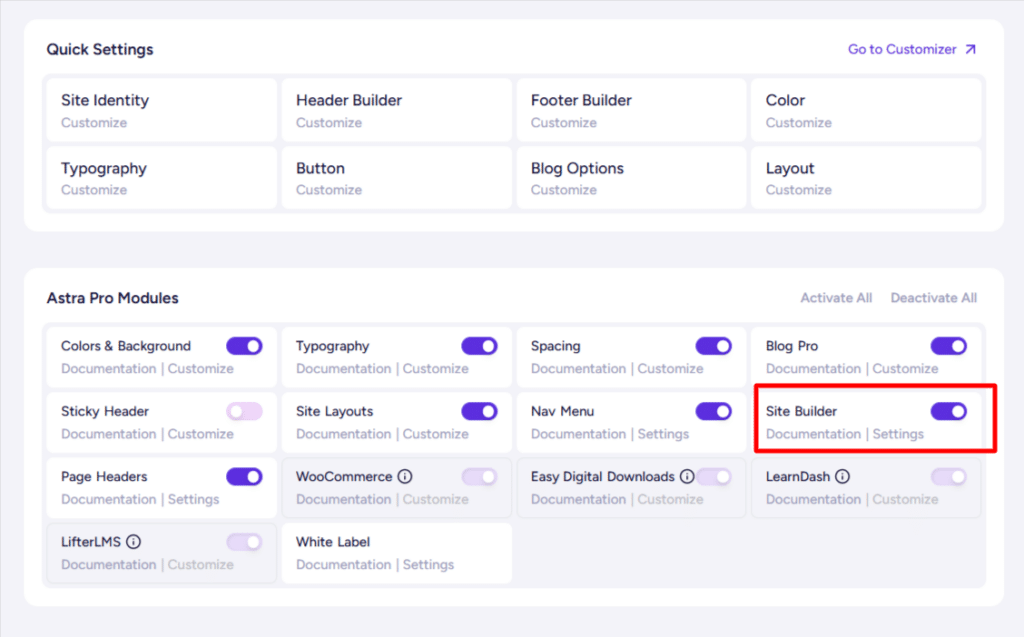
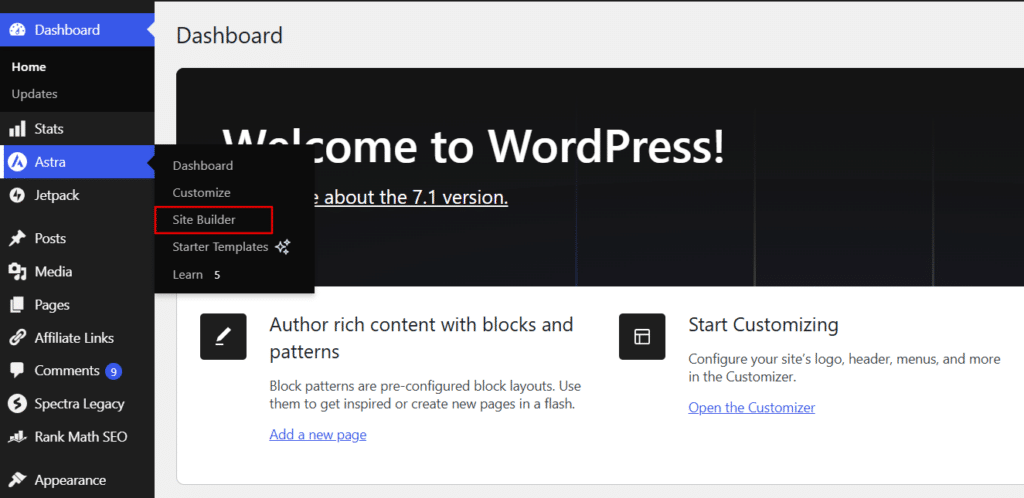
You can click Settings (in the toggle button)to open Site Builder directly, or from your WordPress dashboard, hover over Astra in the left sidebar, then click Site Builder.
Either option takes you to Step 2.
Step 2: Select the Hooks Layout
Site Builder opens in a panel showing the available layout types under Website Parts: Header, Footer, Hooks, Inside Post/Page, Single, Archive, and 404 page.
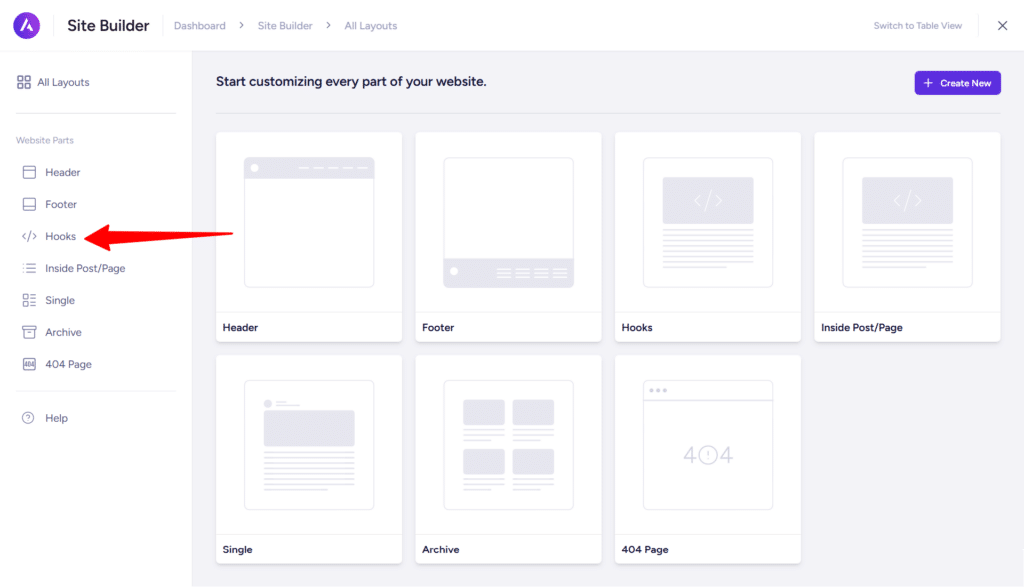
Since we’re managing scripts, click Hooks.
Step 3: Enable the Code Editor
A new Hook entry opens in the standard WordPress block editor, with a title field and an Enable Code Editor button in the top toolbar. Click it.
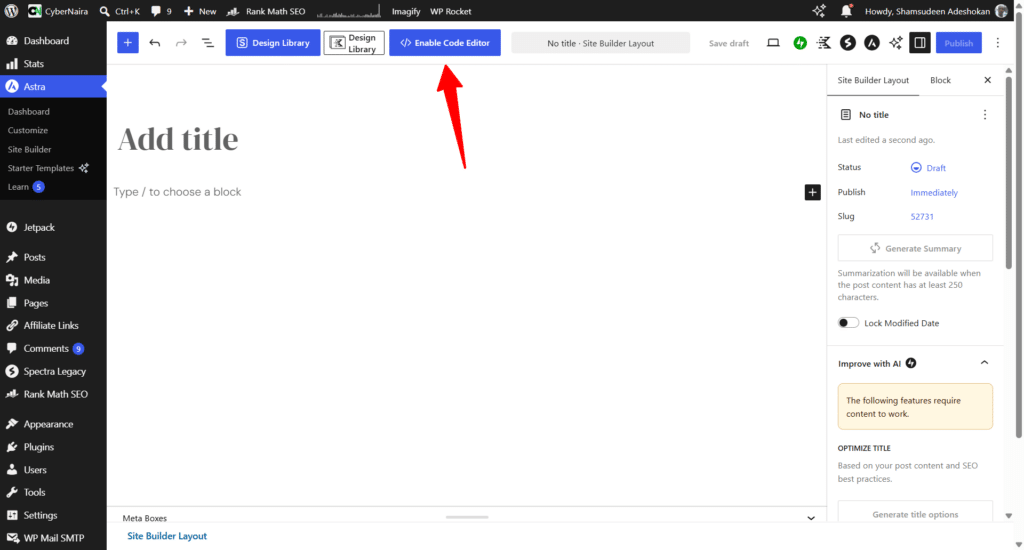
WordPress may show you a pop-up asking if you want to leave the page. This is just WordPress confirming you meant to exit the block editor. Click Leave to continue.
Step 4: Name Your Entry and Add the Script
You’re now in the code editor; give the entry a clear, descriptive title (something like GA4 Tracking Script or Meta Pixel) so you can identify each script later. Next, paste your script into the code editor area, replacing the placeholder text.
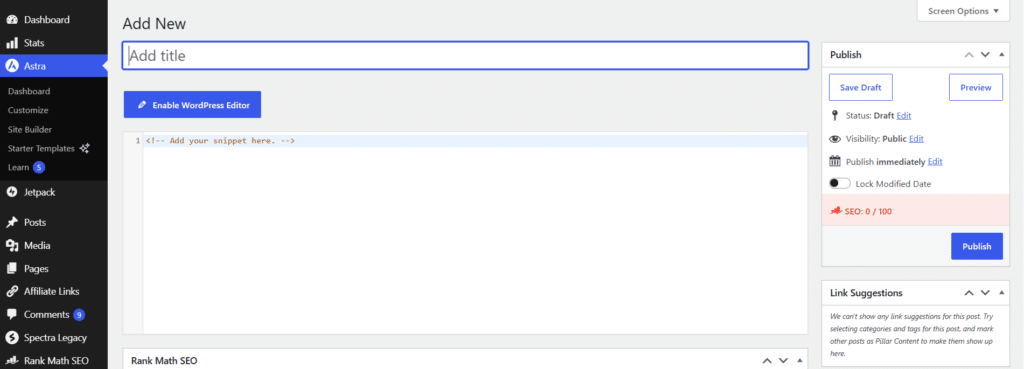
Don’t hit publish yet. The settings below the code editor are what make this feature genuinely useful for managing scripts, so it’s worth understanding each one before you go live.
Step 5: Configure the Custom Layout Settings
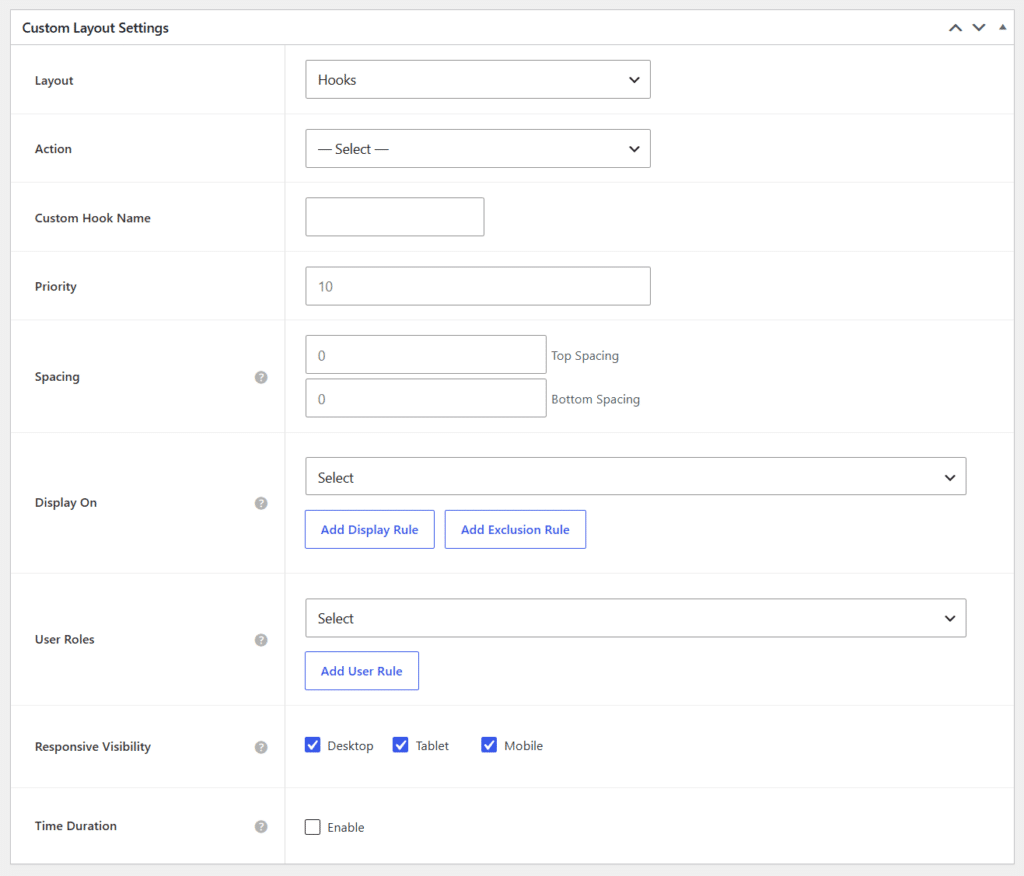
Scroll down to the Custom Layout Settings panel. Here’s what each field controls.
Layout and Action
You need to select Hooks again from the Layout dropdown options, since you’ve exited the standard Gutenberg Editor. The Code Editor page defaults to the first Layout option.
The Action dropdown is where you choose exactly which hook location the script should load into. Options are grouped by selection, depending on your WordPress stack (WooCommerce, for example), including:
Other groups include Sidebar and Comment, plus a Custom Hooks option for developers who want to target a specific hook by name using the Custom Hook Name field.
Each one gives you several content sections or template parts to hook your script into.
For most tracking and analytics scripts, WP Head (under the Head group) is the right choice. It’s the standard location for scripts like Google Analytics, Google Tag Manager, and most verification tags.
Priority
Priority controls the load order when multiple hooks target the same location. It defaults to 10. Lower numbers load earlier.
You generally don’t need to change this unless a script depends on another script loading first (for example, a tag manager container loading a tag that references it).
Spacing
Top and bottom spacing settings add visual padding around whatever the hook inserts. For scripts specifically, this typically stays at 0, since you’re not inserting visible content.
Display On
This controls which pages the script fires on. Instead of loading a script sitewide by default, you can scope it to what you need: Entire Website, All Singular posts, All Archives, or something more specific under Special pages (404 Page, Search Page. Blog/Posts Page, Front Page, Date Archive, Author Archive) Post (All Posts, All Posts Archives, Categories, Tags), Pages, and any custom post type registered on your site.
Use Add Display Rule to include additional targets, or Add Exclusion Rule to exclude specific pages, which is useful if you want a script running everywhere except one or two pages.
User Roles
These settings let you control which logged-in user roles trigger the script, with options ranging from All, Logged in, and Logged Out, up through roles like Administrator, Editor, Author, Contributor, and Subscribers.
This one matters more than it looks. If you’re adding an analytics script like GA4, you probably don’t want your own admin visits skewing the data. Setting this to exclude Administrator (or restrict it to Logged-out visitors) keeps your new traffic out of the numbers. Use Add User Rule if you need to combine more than one condition.
Responsive Visibility
Checkboxes for Desktop, Tablet, and Mobile let you control which device type loads the script. This is useful for a script tied to go a so effective ad placement of a mobile-only or desktop-only campaign.
Time Duration
If a script is only relevant for a limited window, such as a marketing campaign or a temporary traffic source test, enable Time Duration and set a start and end date and time, down to the seconds, in your site’s timezone.
Once the end date passes, the script automatically stops loading, so you don’t have to remember to remove it annually.
Step 6: Publish
Once your settings are configured, click Publish. The script will now load according to the rules you set, without any manual edits to your theme’s header or footer files.
Common Scripts You Can Manage This Way
Atra Site Builder’s Hooks feature works well for most third-party code you’d otherwise insert manually, including:
Several of these, especially Meta Pixel and conversion tracking, tie directly into optimizing your site for lead generation, so it’s worth setting them up correctly from the start rather than retrofitting them later.
Best Practices for Managing Scripts with Astra Site Builder
FAQs
Conclusion
Astra Site Builder’s Hooks feature turns script management into something you control with settings instead of manual code edits.
Between hook placement. Page targeting, user role exclusion, device targeting, and schedule start and end dates, it covers most of what a dedicated code snippet plugin would offer, without adding another plugin to your site.